Before we start the lab:
There has been some updates to Spatial. Please update Spatial using the following commands so that you don’t run into errors for the GEMM section.
cd spatial # move into where your spatial code is
git pull   # one update should appear
make clean
make publish
Running the Tests
The run.sh file contains the commands to run the tests in this lab. You can run specific tests selectively by commenting out the ones you don’t want to run.
chmod +x ./run.sh   # do this if you see "Permission denied" when trying to run ./run.sh
./run.sh
Design a Math Kernel in Spatial and Understand Its Performance
In this lab, we are going to explore more advanced features in Spatial.
We will first go through the details of using controllers. Then we will use the controllers to build an app for accelerating matrix multiplication. We will also learn about how to improve the performance of your design via parallelization and fine-tuning.
More specifically, the elements used in this lab are:
Controllers: MemReduce, MemFold, FSM
On-chip memory components: LUT
Tools for optimizing applications: PostExecution.html, fine-tuning the parallelization factors.
MemReduce, MemFold
Code for this section can be found in
src/test/scala/Lab2Part1.scala.
A Reduce controller operates on a single register. In contrast, a MemReduce controller operates on a piece of on-chip memory (SRAM). From a high-level point of view, Reduce is designed for scalar operations and MemReduce is designed for tensor operations. You can use MemReduce by using the following syntax:
// Create a MemReduce Controller
MemReduce(accum_sram)(N by n){ i =>
  // map body
}{// binary operator}
For example, you can add a list of arrays by using MemReduce:
// Create an SRAM to store the reduced results
val a = SRAM[Int](16)
// Add 10 SRAMs together, where each SRAM contains only ones.
MemReduce(a)(-5 until 5 by 1) { i =>
  // Create an SRAM
  val tmp = SRAM[Int](16)
  // For each element in the tmp SRAM, fill it with 1
  Foreach(16 by 1) { j =>
    tmp(j) = 1
  }
  tmp
}{_+_}
The end-to-end application will look like:
// MemReduce
@spatial class Lab2Part1SimpleMemReduce extends SpatialTest {

  val N = 16.to[Int]

  def main(args: Array[String]): Unit = {
    val out = DRAM[Int](16)
    Accel {
      val a = SRAM[Int](16)
      MemReduce(a)(-5 until 5 by 1){i =>
        val tmp = SRAM[Int](16)
        Foreach(16 by 1) { j => tmp(j) = 1}
        tmp
      }{_+_}
      out store a
    }

    val result = getMem(out)
    val gold = Array.tabulate(16){i => 10.to[Int]}
    printArray(gold, "expected: ")
    printArray(result, "result:   ")

    val cksum = gold.zip(result){_==_}.reduce{_&&_}
    println("PASS: " + cksum + " (Lab2Part1SimpleMemReduce)")
  }
}
Your Turn
We also have a MemFold controller, which looks very similar to fold but operates on memories. In this part of the exercise, your task is to reimplement Lab2Part1SimpleMemReduce using MemFold. Fill in the commented TODO section in the Lab2Part1.scala file under the class name Lab2Part2SimpleMemFold.
Make sure that you intialize your SRAM before passing it to the MemFold controller. Like Fold, MemFold assumes that you have intialized your MemFold SRAM beforehand.
FSM
Code for this section can be found in
src/test/scala/Lab2Part3.scala.
Spatial also supports using Finite State Machine by instantiating an FSM controller. It has the following syntax:
FSM(// initial condition)(// constraint on the state) { state =>
  // Body of the state machine
}{ // rules for generating the next state }
For example, if you want to fill an SRAM of size 32 using the following rules:
- If index of the SRAM is greater than or equal to 16:
- If index == 16, set the element at the location (index - 16) to the value 17.
- If index == 17, set the element at the location (index - 16) to reg.value.
- Otherwise, set the element at location (index - 16) to be the value of the index you are currently on.
- If index is smaller than 16:
- If index < 8, set the element at the location (31 - index) to be index
- Otherwise, set the element at the location (31 - index) to be index + 1
You will need to implement it in Spatial that looks like:
reg := 16
FSM(0)(state => state < 32) { state =>
  if (state < 16) {
    if (state < 8) {
      bram(31 - state) = state // 16:31 [7, 6, ... 0]
    } else {
      bram(31 - state) = state+1 // 16:31 [16, 15, ... 9]
    }
  }
  else {
    bram(state - 16) = if (state == 16) 17 else if (state == 17) reg.value else state
  }
}{state => state + 1}
An example of the end-to-end application looks like:
@spatial class Lab2Part3BasicCondFSM extends SpatialTest {

  def main(args: Array[String]): Unit = {
    val dram = DRAM[Int](32)
    Accel {
      val bram = SRAM[Int](32)
      val reg = Reg[Int](0)
      reg := 16
      FSM(0)(state => state < 32) { state =>
        if (state < 16) {
          if (state < 8) {
            bram(31 - state) = state // 16:31 [7, 6, ... 0]
          } else {
            bram(31 - state) = state+1 // 16:31 [16, 15, ... 9]
          }
        }
        else {
          bram(state - 16) = if (state == 16) 17 else if (state == 17) reg.value else state // Test const, regread, and bound Mux1H
        }
      }{state => state + 1}

      dram(0::32 par 16) store bram
    }
    val result = getMem(dram)
    val gold = Array[Int](17, 16, 18, 19, 20, 21, 22, 23, 24, 25, 26, 27, 28,
                          29, 30, 31, 16, 15, 14, 13, 12, 11, 10, 9, 7, 6, 5, 4, 3, 2, 1, 0)
    printArray(result, "Result")
    printArray(gold, "Gold")
    val cksum = gold.zip(result){_ == _}.reduce{_&&_}
    println("PASS: " + cksum + " (BasicCondFSM)")
  }
}
Your Turn
Let’s try a different example. Here is the set of rules:
Fill an SRAM of size 32 using the following rules:
- If the index of the SRAM is smaller than 8
- Set the element at index to be index
- If the index of the SRAM is within [8, 16)
- Set the element at index to be index * 2
- If the index of the SRAM is within [16, 24)
- Set the element at index to be index * 3
- Otherwise
- Set the element at index to be index * 4
Fill in the commented TODO section for Lab2Part3BasicCondFSMAlt in the Lab2Part3.scala file.
LUT
Code for this section can be found in
src/test/scala/Lab2Part4.scala.
A LUT has the following syntax:
val lut = LUT[Type](N0,N1, ..., Nm)(const0.to[T], const1.to[T], ...)
The (N0,N1, ..., Nm) is the size of each dimension and (const0.to[T], const1.to[T], ...) is the initialization values. The values will be initialized in a row major order.
This creates a LUT of m dimensions. Given that m is 4, you can access an element in lut by
using:
val lut_ijmn = lut(i,j,m,n)
Therefore, lut(0,0,0,0) will be const0 and lut(0,0,0,1) will be const1.
Your Turn
- Please use the LUT syntax to implement the app in
Lab2Part4LUTwhich is under theLab2Part4.scalafile. The LUT is 3 by 3 filled with integers from 1 to 9. What we want to do here is that given a LUT, the user will provide a base value, index i and index j. The output should be base value + LUT(i,j).
Designing An Accelerator for Matrix Multiplication
General Matrix Multiply (GEMM) is a common algorithm in linear algebra, machine learning, statistics, and many other domains. It provides a more interesting trade-off space than the previous tutorial, as there are many ways to break up the computation. This includes using blocking, outer products, and systolic array techniques. In this tutorial, we will demonstrate how to build a blocked GEMM application using outer products.
Data Setup and Validation
Let’s start by creating the data structures above the Accel that we will set up the matrices and compute the gold check. We will expose the dimensions of the matrices as command-line arguments.
import spatial.dsl._

@spatial class GEMM extends SpatialTest {

  def main(args: Array[String]): Unit = {

    type T = FixPt[TRUE,_24,_8]

    // Reading in arguments for the dimensions of the matrices
    val M = ArgIn[Int]
    val N = ArgIn[Int]
    val K = ArgIn[Int]
    setArg(M,args(0).to[Int])
    setArg(N,args(1).to[Int])
    setArg(K,args(2).to[Int])

    // Declaring & Initializing the input matrices and output matrix
    val a_data = (0::args(0).to[Int], 0::args(2).to[Int]){(i,j) => random[T](3)}
    val b_data = (0::args(2).to[Int], 0::args(1).to[Int]){(i,j) => random[T](3)}
    val c_init = (0::args(0).to[Int], 0::args(1).to[Int]){(i,j) => 0.to[T]}
    val a = DRAM[T](M, K) // input matrix 1
    val b = DRAM[T](K, N) // input matrix 2
    val c = DRAM[T](M, N) // an initial matrix for the result

    setMem(a, a_data)
    setMem(b, b_data)
    setMem(c, c_init)

    Accel {
      // TODO: Set up accelerator code for MatMult
    }

    val accel_matrix = getMatrix(c)

    // Gold calculation & checking
    val gold_matrix = (0::args(0).to[Int], 0::args(1).to[Int]){(i,j) =>
      Array.tabulate(args(2).to[Int]){k => a_data(i,k) * b_data(k,j)}.reduce{_+_}
    }

    printMatrix(accel_matrix, "Received: ")
    printMatrix(gold_matrix, "Wanted: ")
    val cksum = accel_matrix.zip(gold_matrix){_==_}.reduce{_&&_}
    println("Pass? " + cksum)
  }
}
Notice that we create an initial matrix for the result and set all values to 0. This is necessary because GEMM using outer products computes part of a tile of the result and accumulates this on top of what was previously in that tile. This means we will need to fetch a tile from off-chip DRAM and accumulate a new result on top of that, then write this new tile back.
Outer Products
The animation below shows how to compute GEMM without tiling, using outer products.

Because we cannot create hardware to handle variable-sized matrices, we must tile the problem. The animation below shows one valid scheme for doing so. We will set our tile sizes in the M, N, and K dimensions above the Accel as follows
val tileM = 16
val tileN = 16
val tileK = 16

Now let’s write the code to implement this computation. The large arrows and boxes represent matrix multiplies on the highlighted tiles using outer products. There will be six nested loops: one for each dimension of tiling and one for each dimension within the tile.
Considering the tiling loops first, this particular animation shows that we are treating the N dimension as the innermost loop, followed by the M dimension, and finally the K dimension. Below shows the nested loops along with the data structures and their tile transfers required within each scope.
Accel {
  Foreach(K by tileK){kk =>
    val numel_k = min(tileK.to[Int], K - kk)
    Foreach(M by tileM){mm =>
      val numel_m = min(tileM.to[Int], M - mm)
      val tileA_sram = SRAM[T](tileM, tileK)
      tileA_sram load a(mm::mm+numel_m, kk::kk+numel_k)
      Foreach(N by tileN){nn =>
        val numel_n = min(tileN.to[Int], N - nn)
        val tileB_sram = SRAM[T](tileK, tileN)
        val tileC_sram = SRAM[T](tileM, tileN).buffer
        tileB_sram load b(kk::kk+numel_k, nn::nn+numel_n)
        tileC_sram load c(mm::mm+numel_m, nn::nn+numel_n)

        // Implement the full outer product here

        c(mm::mm+numel_m, nn::nn+numel_n) store tileC_sram
      }
    }
  }
}
Note that we must compute the numel_k,numel_m,numel_n values to handle the edge cases correct, when the tile dimensions
do not evenly divide the full matrices.
Also note that we declare tileC_sram as a .buffer SRAM. If you do not declare it this way,
the compiler will throw an error about this and explain the issue. You will learn more about
this in the Advanced Buffering
Next, we will implement the full outer product of the tiles that we have brought into the chip.
Your Turn
In every iteration of the innermost Foreach, we bring in two SRAMs of data. From the animation, you should have seen how we use the two SRAMs to populate a third one, and then write it back to Matrix C. In the comment section(“Implement the full outer product here”), please implement this design. As a little hint, you should first think of the proper controller to use. Here are some behaviors of tiling and outer product that would help you figure out the proper controllers to use.
- Output Product: Given two input matrices, it computes a matrix using a column of the first matrix and a row of the second matrix. This is repeated
numel_ktimes and the output matrices will be accumulated. - Tiling: You need to accumulate the results from the input tiles that are computing for the same output tile.
You can add your implementation to the Lab2Part5GEMM in the Lab2GEMM.scala file.
Advanced Buffering
This section will explain why we had to add the buffer flag for tileC_sram in the previous section. To put in a nutshell, this is to annotate that we are going to use this SRAM as a triple buffer (You can think of this as similar to a double buffer).
This Accel above already implements coarse-grain pipelining at various levels. For example, the controller whose counter is nn has
three stages in it.
1) Load tileB_sram and tileC_sram in parallel
2) Perform the computation into tileC_sram
3) Write the resulting tileC_sram back into the appropriate region of DRAM.
This is an example where the compiler will create a triple-buffer for tileC_sram in order to ensure that the correct values are being worked with
when this coarse-grain pipeline fills up and executes.
If you had not declared tileC_sram as a .buffer SRAM, then the compiler is suspicious of your code. This is because it is generally
very easy when specifying pipelined hardware to accidentally create loop-carry dependency issues. Specifically, in this code, it sees that
you write to the SRAM in the first stage, and then write to it again in the second stage. It is very easy, even for advanced users, to
write this kind of structure without realizing it and then receive an incorrect result when using a cycle-accurate simulator of the hardware
because of values “rotating” through the buffer inadvertently.
The animation below specifically demonstrates the triple buffer tileC_sram in this algorithm.
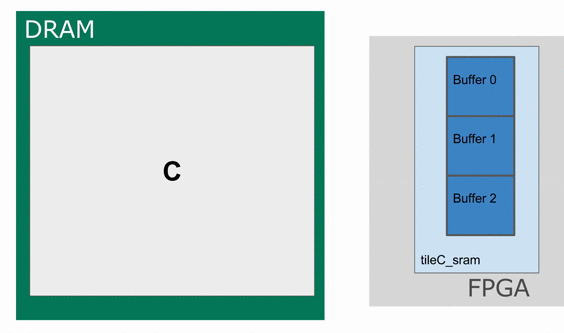
Note that at the beginning and end of each row, there are a few iterations where parts of the buffer are not being used. This is because of the way the loops are written, such that we step through each tile in the N dimension before we increment the tile for M. If you want to write the app such that there are no wasteful fill and drain iterations, you must combine loops appropriately.
Understanging Performance
Now that you have finished writing an algorithm, you will want to try to improve performance. As we have seen in lab 1, you can get the cycle count for each controller through the gen/CS217/Lab2Part5GEMM/info/PostExecution.html.
Your Turn
Let’s try to parallelize the code you wrote in the previous section for matrix multiply. Add a proper parallelization factor to the controllers you used to implement the outer product computation. You can add parallelization factors as shown below. For more detailed example for parallelizing your design, refer to the case study we went through in lecture 4.
val data = DRAM[Int](32)
Accel {
  val input = SRAM[Int](32)
  val output = SRAM[Int](32)
  input load data
  Foreach(0 until 32 par 16) {i =>
  output(i) = input(i) * 2
}
data store output
- Add your implementation to the commented section (
TODO: Implement the full outer product here) ofLab2Part6GEMMin theLab2GEMM.scalafile. - In
lab2-part6.md, answer the questions based on the performence gain you observed ingen/CS217/Lab2Part6GEMM/info/PostExecution.html. The answers don’t have to be lengthy. Just try to provide the information the questions ask.
Submission
You should add the following implementation to each file and fill in lab2-part6.md.
- In
Lab2Part1.scala: Fill in the commentedTODOsection inLab2Part2SimpleMemFold. For more detail, refer to MemReduce, MemFold section - In
Lab2Part3.scala: Fill in the commentedTODOsection inLab2Part3BasicCondFSMAlt. For more detail, refer to FSM section - In
Lab2Part4.scala: Fill the commentedTODOsection inLab2Part4LUT. For more detail, refer to LUT section - In
Lab2GEMM.scala: Fill the commentedTODOsection inLab2Part5GEMMandLab2Part6GEMM. For more detail, refer to Lab2Part5GEMM, Lab2Part6GEMM. - Fill in
lab2-part6.md.
What you shoud submit to Gradescope
As we are using GitHub Classroom, you don’t need to submit your code to gradescope. Fill in the code and lab2-part6.md file in your repository and submit the repository and commit ID you would like to be graded on to gradescope.
To submit your repository address and commit ID, you can use this template.
- Create a copy of the template (as long as you write down your GitHub Classroom repository and commit ID, you don’t necessarily have to use the template.)
- Fill in your GitHub Classroom repository and commit ID
- Download it as a PDF
- Submit it to Gradescope